Fabric Installation Part-2
Setting up Hyperledger Fabric
July 15, 2019Business Modeling in Hyperledger
July 15, 2019Fabric Installation Part-2
https://medium.com/@furqaan.vnurture/fabric-installation-part-2-b235efe25568
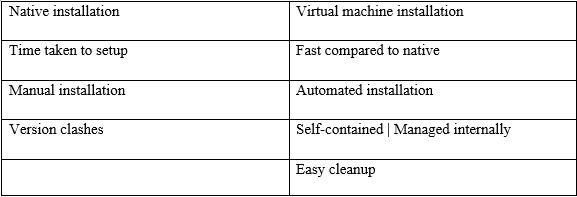
· Difference in the native and virtual-machine installation

Dev Setup:
Vagrant: vagrant is a tool for building and managing the virtual machine environments in a single workflow.
It is a command-line tool for managing virtual machines
The workflow for creating and managing the virtual machine is managed by a configuration file known as the Vagrant file.
The virtual machine is created by executing the vagrant command. The vagrant command checks the vagrant file for getting the configuration of the virtual machine, then it invokes the API from the virtual box to create the actual virtual machines.
Installation of the virtual box:
First check if it is already installed on your machine. If you installed the Docker Toolbox then the VirtualBox will be installed as it is a part of the Docker installation.
If it is not installed then download and install the VirtualBox > https://www.virtualbox.org/wiki/Downloads
Vagrant:
To download the Vagrant use this link > https://www.vagrantup.com/docs/installation/
Vagrant Command:
Vagrant up — -to start the VM
Vagrant halt — -to gracefully shut down the VM
Vagrant ssh — -to Log into the VM
Vagrant Destroy — — to delete the VM
Clone the Repository:
To clone the repository, open the command prompt and write the command > git clone https://github.com/acloudfan/HLF-Vagrant-Dev-Setup
After cloning the Repository, open it in the VS code editor
Installation of Pre-requisite Tools:
Here, we will see how to install the pre-requisite or dependencies on the virtual machine and also install the fabric tools and composer tools in the virtual machines.
The pre-requisite installation process below:
Change the directory to the path of the repository to bring up the vagrant service.
First execute the command > vagrant up — it will start the virtual machine
Log in to the vagrant > vagrant ssh — it will log in to the virtual machine

Run the script > ./scripts/install-prereqs.sh — it is available in script folder

This will download all the dependencies on the virtual machine.
Now, logout of the virtual machine, to logout write the command > logout and log back in by using the command > vagrant ssh
Installation of Fabric Tools:
First log in to the virtual machine > vagrant ssh
Execute the fabric-tools install script
./scripts/install-fabric-tools.sh
./scripts/install-composer.sh
Post Installation Steps:
First, we will download the fabric docker images and to download it
Vagrant ssh
After log in change the permission by command > chmod 755 *.sh
Execute the script to download the fabric docker images
./downloadFabric.sh
This will pull the images for the fabric and install in the virtual machine.
Now, we will install the Peer Admin Card, the Peer Admin Card is one type of certificate to make sure that the admin is certified and can access the feature which are permissioned to it.
First, setup the utility
Cd util
npm install
Create PeerAdmin Card by launching the utility using command
node ./devutil.js

We will be using the docker tools installed on the host machines to get the status of the containers to get the information about containers in the virtual machine. For this we have to set the environment variable on the host machine.
DOCKER_HOST =tcp://localhost:2375
Rename or remove the DOCKER_TLS_VERIFY both will work.
To check the setup is working run the command,
docker images — on your host machine

In the last step, we will validate the Dev Environment setup,
vagrant ssh — first login to the vagrant
Execute the shell script:
./startFabric.sh — this will start all the fabric components in the docker container
docker ps — check the status of the container
docker logs –tails 10 <<containers name>> — — this will show the logs last 10 line
./stopFabric.sh — to shut down the fabric environment


